Easy candle holder vase for Mother’s day

candle holder flower vase

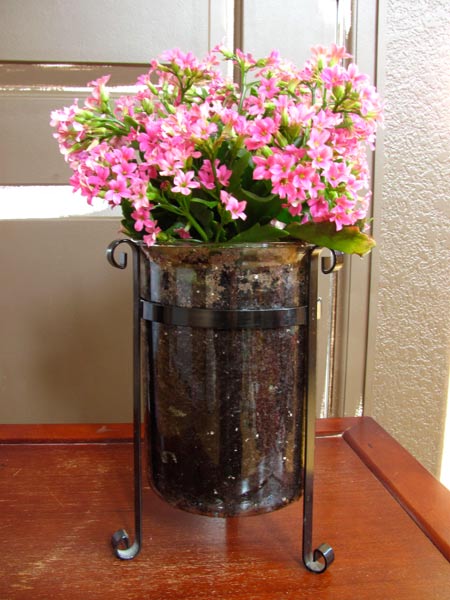
I was cleaning out the cabinets of miscellaneous stuffs over the weekend and found a fabulous candle holder left lonely and unused. It’s got a terrific glass cylinder held by an elegant cast iron stand. I stopped using it because tall candles always left wax marks on the glass if anyone moved the thing around and dust was shown off like it was the star of the piece. I’m having a fancy little luncheon for Mother’s day this year so I thought I’d turn this candle holder into a potted plant holder to pretty up the table.

candle holder flower vase

Easy peazy, right?

Just clean the glass  out, add some gems to the bottom, pile on the dirt and plant a vibrant plant (no idea what kind of plant it is) and voila! No need for glue or even scissors on this one. I could had added some twine or a pretty wire embellishment, but I love the vessel just as it is, so adding the right flowers was the main focus.

Bonus! is a double whammy for me… the potted plant was a birthday gift from my grandmother, so now I can show it off in style. You can make a flower vase out of just about anything. Think pretty glass jars and beautiful blooms. Look around your own house for any decorative piece you might be neglecting and turn it into duel purpose points of interest. For a more artistic effect, fill glass cylinder with water beads and flower stems or plants that can thrive without the dirt.
Here are a few other project inspirations made from repurposed items that I simply painted to liven up and make new again.

repurposed painted items for Mother's day

You can check out more wonderful Mother’s Day craft ideas by hopping around this month’s Designer Connection blog hop.

Have fun and get exploring! [ Hop back ][ Hop forward ]


Looking for more Mother’s Day inspiration?

Here are some other things I’ve created that would make great Mother’s Day gifts and accessories.

have_posts()) : $my_query->the_post();
?>

array( ‘Thumbnail’ ), ‘default_size’ => ‘thumbnail’ ) ); ?>

“;} ?>


And the winner is…

Earlier in the month I posted about a fun Giveaway being sponsored by Julie McGuffee, the host of Scrapbook Memories.

The lucky winner is Cindy M. from Altered State of Mine Altered State of Mine.

Congrats Cindy!!

Thank you all for entering to win. Watch for another great craft giveaway and instruction on how to enter at the beginning of May!

In the meantime, toodle around all the great sites included in this project.. fabulous designers creating inspiration in a whole slew of directions!

Scrapbook Memories

Browser the fantastic creations for this months Designer Connection Hop:
Choose a direction and start hopping:
[ Hop back ][ Hop forward ]


Make your own pretty wire garden art

Making wire garden art

Here’s a really neat spring project you can make using recycled wire hangers. I know, you should return them to the dry cleaner.. but why when you can make pretty flowers and dragonflies to decor your garden instead? Plus, you get the added benefit of making a pretty piece of art using a bit of recycled materials, Yay You! You can make any shape you’d like, just keep in mind that bending the hanger wire is an acquired skill that takes a little patience and practice.

Making wire garden art

Recycled wire garden art

pretty wire garden art pieces

Supplies you’ll need:

Make sure the supplies you use can withstand the elements as you’ll be placing these outside.

  • Wire clothing hangers
  • Metal jewelry wire in a variety of colors
  • Glass gems
  • Wire cutters for the jewelry wire
    – Tip: to cut the hanger wire, bend back and forth until it snaps. I did not cut any hangers in these examples.

Steps for making wire garden art

How to make wire garden art:

  1. Remove any paper and straighten out your clothing wire. Don’t worry about the very end where the wire twists from manufacturing, you can incorporate this into your art design.
  2. Carefully bend wire into desired shape. A trick to quick bending is use the flattest surface of your thumb to guide the bend you’re working on. Make sure to leave a port of the wire straight as the “stick” of the garden art piece.
  3. Using jewelry wire, wrap and secure joining sections of hanger.
  4. Use jewelry wire to wrap and secure gems in desired locations and embellish with wire accents.

Giveaway for April – I love Scrapbook Memories

Scrapbook MemoriesApril is my favorite month of the year for a number of reasons. This year I have another reason to be excited, I’m a part of a group that is giving away a set of DVDs of the final series of Scrapbook Memories. If you’re curious, read more about the April craft give away and come back here and enter to win.

To enter to win you must:

  1. Leave a comment below about your favorite craft show (past or present).
    In theory you were supposed to have hopped around all the participating sites to find the Scrapbook Memories logo and THEN comment. However, you’re already here… look above and on the lower right, see the logos? SO please take a moment to hop around and visit the other participating sites. Tell me which one’s you love when you leave your giveaway comment below.

Julie McGuffee is the Host of Scrapbook Memories, a TV show that airs on PBS and BYU TV nationwide. Julie shares a tons of tips and inspiring ideas to make your scrapbook and memory crafting fabulous.

Don’t just comment and go…
Hop around a bit before you leave your comment. I’m always in awe of the amazing creations others come up with, so I want you to feel the inspiration too. It’s often intimidating to me to be surrounded by so many talented people. However, it’s also very encouraging to see so many different perspectives and techniques.

Choose a direction and start hopping: [ Hop back ][ Hop forward ]


A little St. Patrick’s Day Shamrock pin of happiness

Shamrock pin with buttons and fabric

We’re not an Irish family, nor do we have any specific Irish traditions we follow. I don’t even own anything green let along know how to make Corned beef and cabbage… maybe I could pull of writing a limerick, but that’s expecting a lot. So finding something to wear to prevent my kids from pinching me is usually a little tough. Thank goodness no one has told my youngest how it all works, I’d be doomed all day.

This year, I thought I’d make a little pin to wear… that will protect me, right?

Shamrock pin with buttons and fabric

Using some fabric scraps and come fabulous Buttons Galore buttons, I made a cute little shamrock pin and I’ll show you how to make one too.


Materials:

  • 3 green buttons – 1/2″ size
    Buttons should be roughly the same size but they don’t have to be exact matches
  • Green embroidery thread and needle
  • 3 pieces of different fabric. 1″ – 1.5″ square, each piece 1/4″ larger than the next.
    I used linen, denim and felt.
  • Pin back
  • 1/2″ x 1″ fabric to cover pin back
  • Fabric glue

Make a shamrock pin with buttons

How to make a fabric and button St. Patrick’s Day Shamrock pin:

  1. Using embroidery thread, stitch and tie each of the three buttons to the center of the first/smallest piece of fabric.
  2. Stitch a line to create a stem.
  3. Stitch border around fabric leaving enough thread to tie bow in upper right corner.
  4. Carefully fray edge of fabric.
  5. Adhere stitched fabric to second piece of fabric.
  6. Carefully fray edges of fabric, snip with scissors if necessary.
  7. Adhere to largest fabric piece.
  8. Glue pin back on back side of finished piece, cover with strip of fabric to ensure a secure attachment. If you prefer to stitch the pin back in place, do so before adhering the last fabric square.

Happy St. Patrick’s Day!
from Jen Goode and her Irish Penguins

St. Patrick's Day Penguins by Jen Goode

Lucky Penguin, I love Ireland Penguin and Leprechaun penguin

Craft your wedding in your own style

Seems now that Valentine’s Day has come and gone, ’tis the season to start planning all the weddings. There are so many directions you can go from simple and small to over-the-top extravagant. I wanted the magical wedding but on a budget. I also wanted an Autumn color scheme in December. So, I ended up making almost everything with the exception of the food and my dress.

DIY Wedding Bouquet by Jen Goode

Today I want to share with you a few of the things that I made for my own wedding using the same simple supplies for a variety of things. I started with my colors and applies that to flowers I wanted to use. Rather than go with fresh flowers, I chose to use silk and other fabric flowers. I wanted my bouquet to be something I could keep and I applied that same thought to the rest of the floral pieces throughout the wedding theme. I even made a special bouquet just to throw so I could truly keep the one I carried. I wasn’t just crafting, I was creating keepsakes for my big day.

DIY wedding flowers

After making my bouquet, I created all the floral accents for the wedding party. From boutineers and corsages to the the flower girl’s basket I created them all using the same flower choices accents with standard tan raffia. I also used the flowers I had chosen to create a pretty floral wedding topper. I then combined the flowers with empty wine bottles in wicker baskets for the table center pieces for our sit-down dinner reception.

DIY Wedding cake topper

I decorated the venue by tieing pretty little bows of raffia and tuelle to end chairs. We also drapped tuelle and twinkle lights above. We purchased an arbor and wrapped more of the flowers and tuelle, and this is where we stood for our ceremony. I had watched sales at Michaels and purchased literally dozens of floral strings, cleaning out two stores at one point. Wedding floral arrangements can end up being one of your biggest wedding expenses. For me, having more people attend was more important than having beautiful fresh flowers. So, by creating all these floral pieces for my wedding myself, I was able to save a ton of cash.

diy floral wedding decor by Jen Goode

I made a variety of other things, odds and ends here and there along with my maid-of-honor and flower girl’s dresses.. I wouldn’t recommend going over board unless you love creating things or your budget requires it. In some cases I could have saved by just buying something… but I wanted my wedding to be unique and I wanted to give back to those involved.

When you’re planning your own wedding, make sure choose your favorites. If you can’t find what you are looking for, figure out how to make it and you’ll be able to look back, proud of what you created. Whatever you do, enjoy the crafting of it… it’s a memory well worth creating.

Materials I used: a variety of faux flowers, floral wire, floral tape, raffia, variety satin ribbon, tulle, a ton of hot glue.

Read more about my crafty DIY wedding at Lesruba Weddings.

This post is a part of the Designer Craft Connection blog hop, so please do take a moment to check out what the other designers are up to… get inspired by the wedding craft happiness.

I spy a trend

I recently attended the premier trade show for the craft and hobby industry. The whole event is a gigantic craft store waiting to explode filled with new ideas, concepts and wow factor for the crafty mind. I was at the show to exhibit my own art to potential licensors so I didn’t have a huge opportunity to see any specific trends.

That said…

I am hearing all kinds of talk about mix media being the up and coming movement. That sounds trend-like to me. I’ve always created in mixed media, I’m too scattered and unattached to pick and stick with one medium as a specialty or focus. I like to mix textures and techniques. I like to see the results of mixing materials… sometimes it’s good and sometimes not so good.

I’m also noticing a growing trend in the use of layers. Layers of color, materials and more often even images to create interest and depth. I think this is the answer to indecisive creativity, but hey, it’s its now cool to collage, yay me! Layers create a visual appeal I don’t think you can get any other way. Add in some extra padding between the layers and you have all kinds of fun happening.

Here is my contribution to the recent trend observations, a hand made bracelet. There are a variety of materials as well as layers upon layers to create the finished piece. I might even go back and add a few more layers… we’ll save that for another day.

Mixed media hand made bracelet by Jen Goode
This item is available for purchase through etsy


Materials:

  • Papers from Graphic 45
  • A recycled duct tape roll
  • Beads
  • String
  • Twine
  • Decorative brads
  • Mod Podge
  • Ice resin

Original bracelet design by Jen Goode

How I made it:

Using the duct tape roll as the foundation for the piece, I decoupaged the paper both on the inside and outside using Mod Podge. After it dried, I added more Mod Podge and various accents from paper, string, beads and brads. I also glued twine alone both the top and bottom edges for an interesting texture finish. Once the entire thing dried over night I brushed on a layer of Ice resin to give it a high shine and protect the various layers from wear. I let that dry again over night. I finished it off with another layer of Ice resin.

Mixed media decopague bracelet by Jen Goode

Mixed media resin bracelet by Jen Goode

Mixed media recycled bracelet by Jen Goode

This item is available for purchase through etsy

Take a look around you, what do you see as a growing trend in the creative universe?


PS – here’s a little fun for you.
You could enter to win a Cricut…
OH YES! Click this cute little bug to find out how.

Vintage desk set in 4 easy steps

I recently got a hold of a papercrafting pack from Graphic 45, I love love love their papers! They have the most beautiful vintage styling and detail to their products and presentation. Here’s a quick and easy project that is both form and function. Using the Graphic 45 papers, various recycled containers and some glue I created a desk set for my husband’s office. Thank you Graphic 45 for these fabulous designs!

Vintage themed desk set
Vintage themed desk set by Jen Goode

I used papers from the “A Proper Gentleman” collection which is full of wonderful textures, patterns and vintage imagery with a classy male focus. Vintage golfers, vehicles and a touch of architecture (which of course my husband, the architect, really liked) is all a part of this double sided paper pack.

Here’s what you need to make this desk set:

  • Various recycled containers, clean and dry (soup cans, small boxes, etc.)
  • Paper, various patterns
  • Aleene’s tacky glue
  • Rubber bands
  • Straight edge
  • Pencil
  • Scissors

How to make this vintage desk set:

Make a pencil/pen holder using a soup can, measure paper to cover leaving 1/8″ space on top and bottom of can for edges to show. Make sure to allow a little overage to overlap when wrapped.

Graphic 45 paper for desk set pencil holder

Using the edge of your scissors against a straight edge, score the paper and then fold and tear so you have a nice rough trimmed edge.

Liberally cover back of paper with glue and wrap around can. Wrap rubber bands around can to hold paper in place.

making a recycled soup can pencil holder

To line inside of can, repeat the above steps to trim then place paper carefully inside the can. Hold in place for 30 seconds to ensure the paper adheres well.

line a soup can with paper to decorate

Continue to measure and cut paper to cover and line additional containers for each item you’d like to create. Because this is vintage inspired, rough cut and torn edges along with weathered corners are ok, it adds to the feel of the piece.

For the business card box, I mixed and matched different papers for the inside coverage.

decorated box for business cards

For the clippy tub I used a cut out of an image from the same paper set to cover a gap where the paper pattern was short.

vintage decorated desk accessory container

You can get a hold of Graphic 45 products from a variety of outlets including:

Scrapbook.com

Two Peas in a Bucket

Buy.com