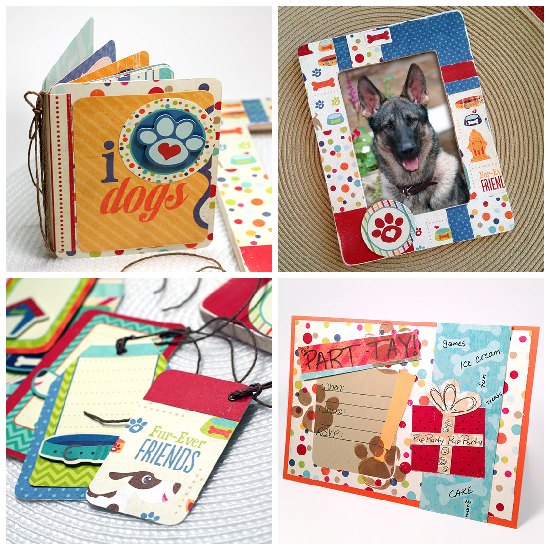
This week Xyron and Imaginisce have teamed up to share creative ideas to use both of their products. I’ve created a few different projects and shared the ideas along with tutorials to make two of the projects. Check out my creative ideas using the Good Dog Collection from Imaginisce and Xyron.
Projects designed with Imaginisce and Xyron by Jen Goode
Read more about these great products and the projects I’ve created at 100Directions.com
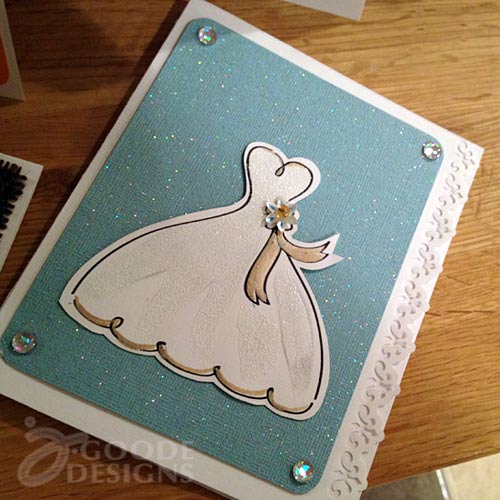
Today is World Card Making day and I have a small handful of hand made cards I’ve created to participate in the fun. I’ll come back later on and show you how you can make your own cards super easy. For now, I wanted to share my favorite of the bunch, this wedding themed card. It features a wedding dress digital art printable you can use in your own personal card making too!
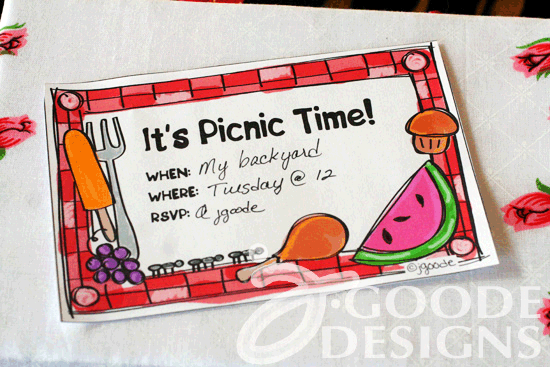
Inspired by this month’s Designer Crafts Connection picnic theme, I created a picnic themed invitation. You can download and print this digital art to use for your own picnic party! One version has the invitation text while a second version is blank so you can write in whatever you’d like. It’s time to get outside and socialize over watermelon and fried chicken (or PB&J). Download the Picnic Party Invitation and Card digital image by Jen Goode.
Printable picnic invitation by Jen Goode
printable picnic invitation and card by Jen Goode
printable picnic invites you can use for your summer fun
You can use the blank card as a Thank You card, a general note card, a note paper to write your picnic shopping list or even as a fun way to highlight a photo taken as your last family picnic. Whatever you decide, have fun with it! Let’s hope the ants are only on the print and not near your real food.
For more fun picnic ideas check out my creative ideas site 100Directions.com. You can also click the Designer Crafts Connection graphic on my sidebar to see what other designers are making this month!
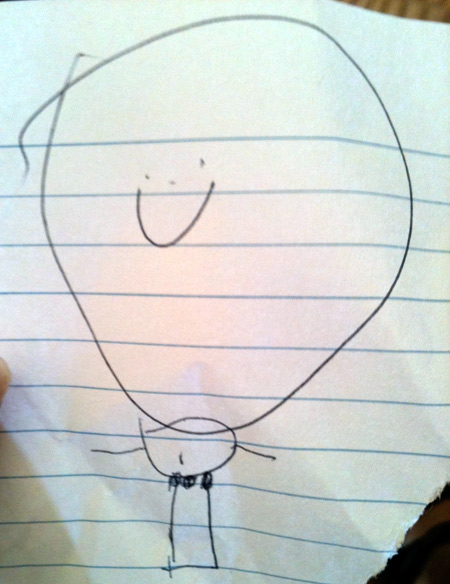
This month’s Designer Challenge is about Journaling, if only I had enough time to sit and capture the moments, I’d have something fabulous to show you. However, the past few months I have been working hard to start and finish a number of projects and portfolio pages for the upcoming Craft and Hobby Association show. I’ll be exhibiting again this year (both 1839 if you are attending also).
So this time around, I don’t have a fabulous project to show you. Although I do have this wonderful picture my youngest drew, I don’t know who it’s supposed to be – glad to know the belly button was not forgotten. Once you’re finished here, please do take a moment to check out the rest of the sites in the hop and you’ll discover all kinds of wonderful things.
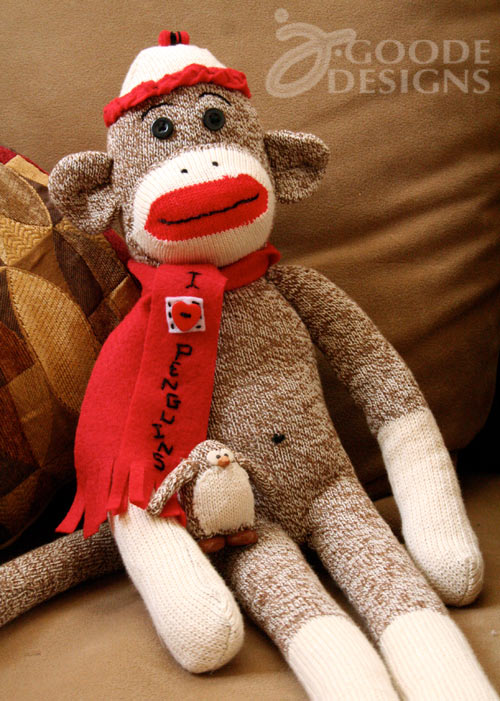
I joined in with a new challenge… make a sock monkey with the help of Ana and Megan Araujo from When Creativity Knocks. They’ve put together a fantastic video tutorial called Sock Monkey’s Go BanAnas. It’s a fun, step by step how to build your sock monkey DVD plus printed patterns using the Original Rockford Red Heeled Socks! I’ve never made a sock monkey, so I was excited to see how difficult it would be. It wasn’t hard at all and only took a couple hours.
Sock Monkey and penguin by Jen Goode
Of course, because penguins seem to pop up everywhere around here, I had to make a penguin out of the sock scraps. I had a great time making this projects! It wasn’t difficult once I checked out the video. Once my sock monkey was created, I started noticing a ton of sock monkeys everywhere I went. Did they really just pop up or had I not noticed until now? I had no idea they were becoming so popular again – crazy fun!
Sock Monkey Penguin and accessories by Jen Goode
There are basic instructions for making a sock monkey that include the sewing, adding eyes and a mouth along with little nostrils for the nose. To add my own personal touch, I included eyebrows and a belly button. I also stitched up a cute hat and a scarf that says “I heart penguins”, all created from felt scraps.
My sock monkey package also included a sock monkey stamp. I started to make a keychain by stamping some polymer clay, but I haven’t finished it just yet…
Rit Dye is a sponsor of this challenge as well, however, I love the brown of the socks so I chose not to dye anything this time.
There’s a contest you can enter until December 19th to win a sock monkey package worth over $40.oo!
Prize pack includes:
DVD “Sock Monkeys Go BanAnas
1 pair of Rockford Red Heeled Socks
Sewing kit, including: needle, button eyes, floss and stuffing
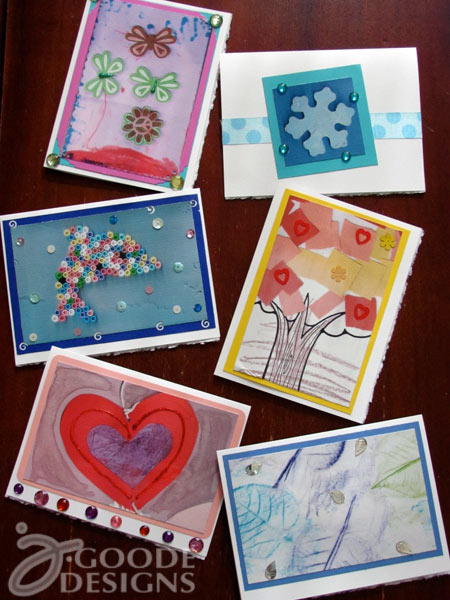
This week I participated in a challenge using the Flip Pal™ mobile scanner. I’m in holiday gift making mode right now and I love to create things with my kids’ art for others in the family to enjoy. So, I combined the two and came up with hand made greeting cards featuring kid’s art. This is a great project to do at home with your own kids or, with the ease of use offered by the Flip Pal, this project could easily be created in a classroom as well.
Handmade cards featuring kids art scanned with a Flip Pal mobile scanner
How cool do these look!? From the photo, they look like layers of paper to make each card, but really it’s a scan, printed out and then placed on top of a plain colored background paper (just for added interest) and then little glitter sparkly things added. Such an easy and fun project! Here’s a close up of the tree card – the paper tree was made as a colored paper collage. I then scanned it, printed it and then added the little sequins. This one is definitely my favorite.
Kids art greeting card close-up
My original project idea was to create a Mother’s charm bracelet featuring kids art. I changed direction when I remembered, not everyone has photo editing and graphics programs nor the time or patience to spend the hours creating like I do. So instead I thought a set of 6 greeting cards would be the perfect hand made gift item everyone could make. Best of all, you can make it with your kids that created the art you are using!
Scanning the images with the Flip Pal brings out a lot of little details you might not get from flat art and a camera. The neat edges of layered paper, crayon textures and even glitter sparkles show up very nicely with this tool. I tried scanning a wide variety of surfaces and textures with my Flip Pal. I removed the cover and literally flipped it over so I could see where I was placing the scanning window which makes it really easy to get an exact crop on an image.
Kids art we scanned to make greeting cards
Scanning art is easy with the Flip Pal
The scanning size of the Flip Pal is 6×4″, which is perfect for making a standard sized card.All you need to do is scan the art, download to your computer, print and create! My 4 year old helped me in the entire process… I used her art, she helped me scan and then made cards and embellished with glitter and sparkly gems and sequins. We had a ton of fun together and now I’m excited we have a pretty set of cards to give as a gift this holiday season.
There’s more… Other designers are participating in this Designer Connection Challenge today, check out their creative Flip Pal creations for more inspiration by looking for the Designer Crafts Connection widget
on the right side of my site (over there —>)!
Disclaimer: I received a Flip Pal™ to review and use in this project. The opinions are 100% my own.
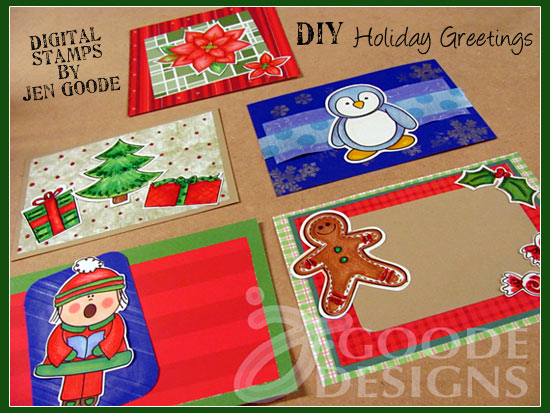
If you’re thinking about making your own holiday cards, gift tags or other seasonal crafty creations, I have a lovely selection of holiday themed digital stamps now available. There are poinsettias, gingerbread men, carolers and even a cute penguin. You can create a wide variety of paper crafts and mix media projects using these images. I’m adding more designs regularly and love to hear your suggestions so please feel free to drop me a note with your requests.
Handmade notecards featuring art by Jen Goode
Take a look at these holiday examples featuring JGoode Designs digital stamps. I mixed the stamps with other paper patterns, card stock and glitter. Simple and easy to make cards featuring super cute art! (Yes, I’m a little biased.)
Handmade notecard featuring gingerbread man digital stamp art by Jen GoodeHandmade notecard featuring penguin digital stamp art by Jen GoodeHandmade notecard featuring Poinsettia digital stamp art by Jen GoodeHandmade notecard featuring Christmas Tree and Gifts digital stamp art by Jen GoodeHandmade notecard featuring Holiday Caroler digital stamp art by Jen Goode
What is a digital stamp? Digital stamps are printable art you color yourself. You download the art, print it at the desired size and then color or paint it however you like to use in your own handmade creations. These are all the designs I wanted to show you, so I printed them all out, colored them using colored pencils and design markers and then cut them out. You can find all my digital stamp designs at LilGoodies.com
Holiday digital stamp designs by Jen Goode cut out and colored
What fun creations do you have planned for the holiday season?
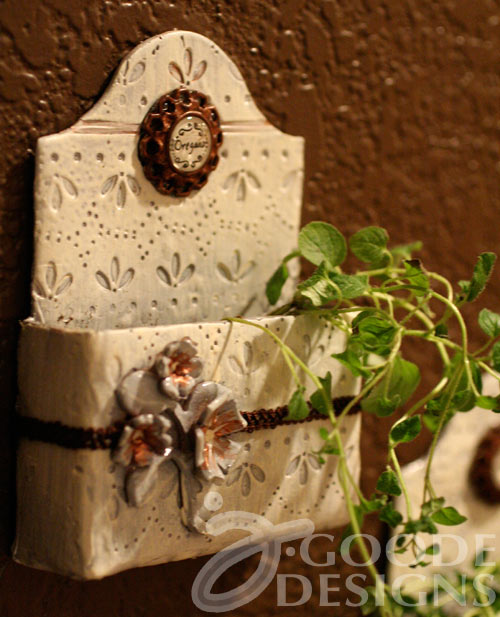
Here’s a new product challenge from Eileen Hull. This project features her new Caddy die by Sizzix embellished with custom shapes from Epiphany Crafts. I love this caddy shape and the countless uses for this particular die. When I first saw it I immediately thought flower pots. The shape is not too big, so it’s perfect for a little wall hanging herb garden right by the kitchen window!
Clay wall hanging flower pot by Jen Goode
I hadn’t used the Sizzix dies with clay, but a couple friends have been telling me the work well together so I thought this was the perfect project to try it. The clay would allow me to plant real plants in the flower pots. The clay also offers opportunities for adding some great texture and hand carved designs to any piece you make. I used a pattern design by Eileen as well to add some neat accents and texture to each pot. I then painted the pots with 2 types of spray paint to give it a ceramic look and then hand painted with a dry brush to finish the color.
Details on clay wall hanging flower pot
For this challenge I also received a fantastic package of goodies from Epiphany Crafts which included a cool tool to make your own little custom shapes to add personalized embellishments to any piece you’d like. I decided to use the Round 14 shape tool and a couple of small metal flower style pendants to make name labels for each pot.
I’m not going to give you a step by step tutorial today, but I’ll give you a little run down…
Materials you need:
Clay, pasta machine, Sizzix Big Kick machine, paint (spray and brush on), parchment paper, scrap cardboard, ribbon or fabric trim, hot glue/gun and scissors
Epiphany Round 14 shape tool and coordinating bubble caps along with metal pendants and DecoArt no-prep metal paint
Eileen Hull’s Caddy die by Sizzix along with Lace Set embossing folders
Some of the steps to make the clay wall hanging flower pot
Quick instruction over view to make these flower pots:
Cut out and emboss Caddy pieces using clay
Build Caddy and bake according to clay instructions
Seal edges with hot glue
Attach clay flower embellishments
Paint as desired
Make custom shape with Epiphany tools and attach as desired
Plant herbs
Hang and enjoy
Clay wall hanging flower pot by Jen Goode using Eileen Hull's Caddy die by Sizzix