DIY notecards with Digital Holiday Stamps designed by Jen Goode

Handmade notecards featuring art by Jen Goode

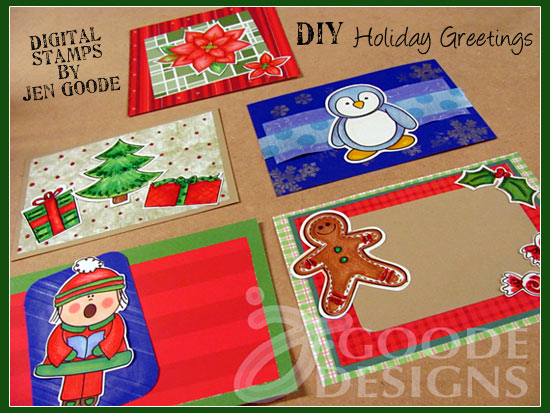
If you’re thinking about making your own holiday cards, gift tags or other seasonal crafty creations, I have a lovely selection of holiday themed digital stamps now available. There are poinsettias, gingerbread men, carolers and even a cute penguin. You can create a wide variety of paper crafts and mix media projects using these images. I’m adding more designs regularly and love to hear your suggestions so please feel free to drop me a note with your requests.

Handmade notecards featuring art by Jen Goode

Take a look at these holiday examples featuring JGoode Designs digital stamps. I mixed the stamps with other paper patterns, card stock and glitter. Simple and easy to make cards featuring super cute art! (Yes, I’m a little biased.)

Handmade notecard featuring gingerbread man art by Jen Goode
Handmade notecard featuring gingerbread man digital stamp art by Jen Goode
Handmade notecard featuring penguin art by Jen Goode
Handmade notecard featuring penguin digital stamp art by Jen Goode
Handmade notecard featuring Poinsettia art by Jen Goode
Handmade notecard featuring Poinsettia digital stamp art by Jen Goode
Handmade Christmas Tree and Gifts card by Jen Goode
Handmade notecard featuring Christmas Tree and Gifts digital stamp art by Jen Goode
Handmade notecard featuring Holiday Caroler art by Jen Goode
Handmade notecard featuring Holiday Caroler digital stamp art by Jen Goode

What is a digital stamp? Digital stamps are printable art you color yourself. You download the art, print it at the desired size and then color or paint it however you like to use in your own handmade creations. These are all the designs I wanted to show you, so I printed them all out, colored them using colored pencils and design markers and then cut them out. You can find all my digital stamp designs at LilGoodies.com

Holiday digital stamp designs by Jen Goode cut out and colored


What fun creations do you have planned for the holiday season?

Holiday greetings from all of us to you

It’s December 16th and I have yet to make my holiday cards let alone send them out. We’re making cookies for the neighbors tomorrow… but I haven’t gone shopping for even an egg. This year snuck up on me, yesterday was mid-July last I looked. So, for my last project in this year’s round of the Triple-Play Sizzix blog hop, I decided to make a holiday greeting I can share with everyone.

Happy Holidays from the Goodes

Happy Holiday Christmas Penguins by Jen Goode

In theory, this Treat bag topper designed by Eileen Hull for Sizzix would have goodies attached to it, however the brownies made last night were attacked by gremlins before midnight. (Yes, The Christmas Penguins are available to purchase on a variety products in my store).

I don’t have the actual die that cut out these shapes, instead of was sent pre-cut pieces to create this project with. However, it’s easy to embellish and decorate pre-cut/pre-made pieces… here’s how.

  1. Gather your pieces. Start off with the pre-cut pieces you’d like to use.
    Sizzix bag topper by Eileen Hull
  2. Pick your art. I chose to print out my own art and text. You can use clipart or go a bit further by stamping and drawing freehand.
  3. Cut and place art. I cut out the art, leaving a generous edge space and ran it through my Xyron for a nice smooth application of adhesive covering the entire piece evenly. I applied to the cut pieces and then trimmed off the excess paper.
  4. Color and accent. Next I colored the entire piece with Prismacolor markers to give more of a handmade feel.
  5. Add the details. I then drew various extras (white dots, loose circles, holly leaves etc.) with Marvy Uchida Puffy Velvet fabric markers, following the instructions to create a bit of a textured effect to my project. I Repeated the process around the edge of the sign piece as well as the white on Santa’s outfit.
  6. Final touches. Finally I applied DecoArt Twinkles glitter paint (crystal) to create the sparkle effect.
Decorated treat bag topper by Jen Goode

Have a Happy Holiday!

You can find the supplies I used at Sizzix, Mister Art, Joann and other retailers.

Check out what other designers have made with this fantastic die by Eileen Hull.

Supplies:

Sizzix.com-Tis the season for planning! 468x60 banner


Christmas ornaments make it home

Two pretty Christmas ornaments made from a little paper, a lot of color layers and really versatile Sizzix die designed by Brenda Pinnick. The die itself can be used in so many different ways, and since I’m continuing on in my holiday spirit mode, I thought ornaments would make a great addition to our Christmas tree.

When I was little, making Christmas ornaments was always a favorite thing to do. Now, things seem to get so busy we don’t stop to make much of anything just because anymore. Today I wanted to change that… we need a Christmas ornament making day!

I started out with a completely different vision, but let the project dictate where it wanted to go. I combined marker coloring, DecoArt metallic paint and embossing powder in various layers to create an aged, vintage feel to these paper ornaments.I finished off the ornament concept by using some Beadalon ColourCraft wire to twist into decorative hooks and hangers attached to the top of each ornament.

Christmas ornament
Christmas ornament by Jen Goode

This design is layered using a painted packing foam and then covered in a gold satin ribbon. The star on the tree is covered in gold glitter paint I found at the Dollar tree. The decorative edging was created with a paper punch and the little red dots on the tree are red seed beads glued into place. I finished off the look with a brown raffia bow.  To get the aged look with the metallic paints, simply apply with a dry brush.

Christmas ornament

Christmas ornament with buttons
Christmas ornament with buttons by Jen Goode

This piece is made with two interlocking pieces of cardstock which I painted with a bronze metallic paint. ( I LOVE these DecoArt Dazzling Metallics paint!). I have a whole jar of the fun brown buttons, and I keep seeing ornaments made with buttons so I thought now would be a good time to try the look. They are simply glued in place. I think it would be nice to add a hint of thread every now and then if I were to make this design again. The red ribbon in the center is raffia.

Button Christmas ornament

Make your own fabulous creation with one of the many terrific products from Sizzix!

Sizzix.com-Tis the season for planning! 468x60 banner

There are a ton of other great designes who have created amazing pieces with this same Sizzix die this week.. check them out by following the blog hop below:

Home Sweet Home

I am jumping on board with another blog hop with Sizzix and some amazing designers. This week’s project uses the Sizzix ScoreBoards Pro 3-D house die by Eileen Hull. It’s an adorable little house that comes complete with a wide array of accessories and add-ons. I decided to make a candy box, and since the holidays are so close, a Christmas theme is surely in order.Plus, no one hands out peppermints for Halloween, so this was a good excuse to go buy some.

3-d sizzix house die by eileen hull

I have to say, my favorite part about this die are the tiny window frames. Ever since I was little and had a set of LEGOS with the little windows with shutters… I’ve been hooked on tiny windows.

I chose to modify the mat board pieces and parts and replace the main house body with a clear plastic so you can see the candy inside the box. The plastic tends to bow a bit when the box is filled so I also added trim to the front and back of the roof to create a lid, holding the plastic box in place.

3D house die from Eileen Hull and Sizzix, decor by Jen Goode

Interesting tid-bit: I couldn’t find card stock thick sheets of plastic so I ended up purchasing a clear plastic Halloween paint can and took it apart for this project.  My original idea was to use enamel and hand paint some decor around the bottom of the box, however the paint can had Halloween decor printed on it, so I had to use the noggin to come up with design that covered the pre-printed plastic.

Supplies I used for this project:

Check out the 60+ other fabulous designer projects on this bloghop: