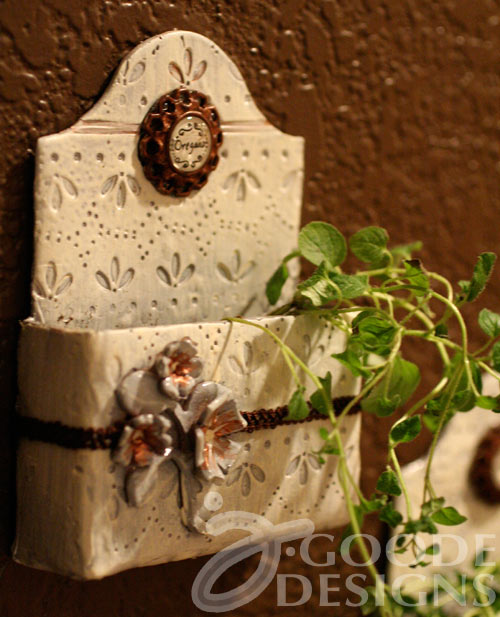
Here’s a new product challenge from Eileen Hull. This project features her new Caddy die by Sizzix embellished with custom shapes from Epiphany Crafts. I love this caddy shape and the countless uses for this particular die. When I first saw it I immediately thought flower pots. The shape is not too big, so it’s perfect for a little wall hanging herb garden right by the kitchen window!

I hadn’t used the Sizzix dies with clay, but a couple friends have been telling me the work well together so I thought this was the perfect project to try it. The clay would allow me to plant real plants in the flower pots. The clay also offers opportunities for adding some great texture and hand carved designs to any piece you make. I used a pattern design by Eileen as well to add some neat accents and texture to each pot. I then painted the pots with 2 types of spray paint to give it a ceramic look and then hand painted with a dry brush to finish the color.

For this challenge I also received a fantastic package of goodies from Epiphany Crafts which included a cool tool to make your own little custom shapes to add personalized embellishments to any piece you’d like. I decided to use the Round 14 shape tool and a couple of small metal flower style pendants to make name labels for each pot.
I’m not going to give you a step by step tutorial today, but I’ll give you a little run down…
Materials you need:
- Clay, pasta machine, Sizzix Big Kick machine, paint (spray and brush on), parchment paper, scrap cardboard, ribbon or fabric trim, hot glue/gun and scissors
- Epiphany Round 14 shape tool and coordinating bubble caps along with metal pendants and DecoArt no-prep metal paint
- Eileen Hull’s Caddy die by Sizzix along with Lace Set embossing folders

Quick instruction over view to make these flower pots:
- Cut out and emboss Caddy pieces using clay
- Build Caddy and bake according to clay instructions
- Seal edges with hot glue
- Attach clay flower embellishments
- Paint as desired
- Make custom shape with Epiphany tools and attach as desired
- Plant herbs
- Hang and enjoy

Before you go…
- Check more great project ideas using this Fresh Vintage Caddy Sizzix die by Eileen Hull.
- You can also enter to win a fantastic giveaway by visiting the Oh My Craft blog.
- Take a look at all the cool tools and accessories from Epiphany Crafts.
- Take a look at all the beautiful products in the Fresh Vintage collection by Eileen Hull at Sizzix


