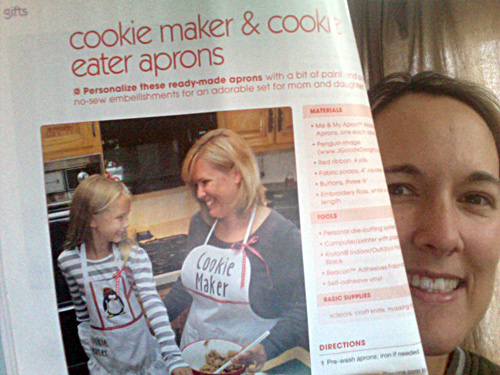
In the December 2011 issue of Crafts ‘n Things magazine, my penguin is showing is smiley face on a cute apron set designed by Roxi Phillips, professional designer extraordinaire. How cute is that!? You can get a hold of the penguin stencil used in this project at LilGoodies.com.
Penguin stenciled on an apron in Crafts 'n Things magazine December 2011
Here’s another challenge, what would you make using The Duck Brand® Duct Tape, VELCRO® fasteners and Westcott Brand® Cutting Tools? In the spirit of Breast Cancer Awareness month, Westcott has sponsored this fun pink filled creative challenge while also joining forces with CharityWings.com to host an auction of some of the design creations from this challenge. Read below to find out how to enter a giveaway of some of the fabulous pink Westcott Brand® Cutting Tools!
Pink Westcott Brand® Cutting Tools
I was sent products from all 3 companies to use and make whatever I wanted. It took a bit of brainstorming, but once I got going, I couldn’t stop!
I’ve seen a ton of duct tape creations over the years, but now there are tons of fun and colorful patterns to choose from instead of the standard gray I grew up with. I received The Duck Brand® Patterned Duct Tape Rolls in a metallic gold, hot pink, hot pink and black tiger/zebra stripe and super cute hot pink Hello Kitty tape. I also received VELCRO® Brand Sticky Back Hook and Loop Fasteners in black, white and pink along with great collection of Westcott Brand® Cutting Tools (all in pink!) including, a cutting mat and craft knife (more about that later).
The Duck Brand® Patterned Duct Tape RollsVELCRO® Brand
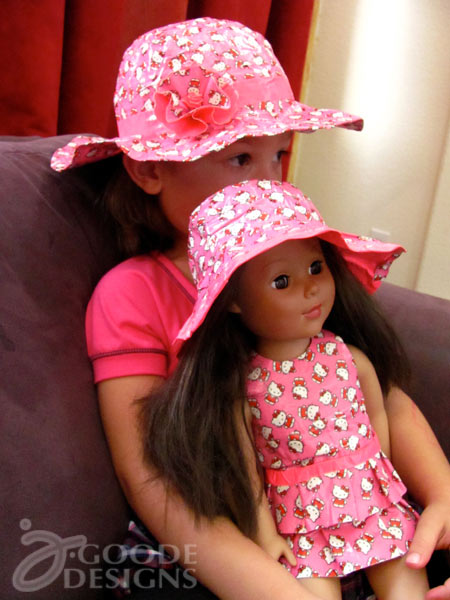
My preschooler LOVES Hello Kitty, so I decided I’d make something for her. A sunhat was the first thing that came to mind, so off I went. Unfortunately, I tried making the hat without my daughter nearby the entire time so my measuring was off. I ended up going to the store, buying a whole new roll of tape and starting over! The second hat turned out perfectly.
I also added a little flower to the hat. Originally I was thinking I’d use VELCRO® brand fasteners so the flower could be changed, however the pink VELCRO® Brand Hook and Loop Fasteners I had aren’t ment for super strong holds and I thought the black or white would stand out too much. So I opted for taping the flower in place with more pink tape.
I had so much fun making the hat that I cut down the first hat to make it a little smaller and it now fits my daughter’s 18″ doll. I created a little doll sundress with the remaining tape and used the VELCRO® brand as fasteners on the back of the dress. We now have a second dress in the works made out of the gold.
Matching hats and doll dress made with The Duck Brand® Duct Tape and VELCRO® brand
The official sponsor of this challenge is:
These scissors are a perfect tool for cutting whatever your craft project requires. The Westcott Brand® Titanium Bonded Non Stick Scissors make cutting things like tape so much easier, making your project happiness that much more fun!
Where to go from here – share and TWO giveways to enter:
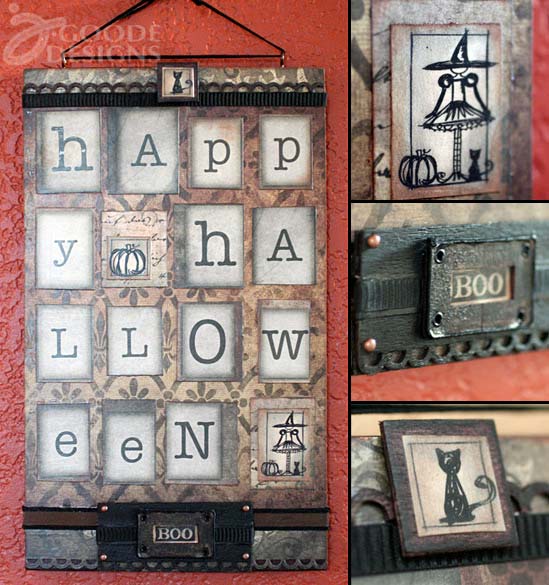
I’m jumping in on another challenge, this time with Eileen Hull’s new Sizzix collection and her Fresh Vintage Album die along with Die Cuts with a View paper packs. The products compliment each other beautifully! I’ve always loved the vintage style designs. I love Steam Punk and classic textures mixed with rough, raw materials. So combining the materials I received with this project and the upcoming Halloween season, I thought I’d make some new decor to add to my own home. I’m so excited about this piece!
Happy Halloween wall decor by Jen Goode
Eileen’s album die design is so fabulously versatile and because it’s a Sizzix Big die cut design it will cut through thick materials and even fabric. The DCWV paper pack I received for this project is called Tattered Time and is filled with warm and weathered vintage style images including gears, rules, tickets, two alphabet sets and a whole slew of wonderful patterns and designs.
Eileen Hull Sizzix Album die and DCWV Tattered Time paper
I used scalloped portion of the die to cut paper from the DCWV pack as well as some balsa wood. I couldn’t be happier with how the die cut the wood. I then took an exact-o knife to trim some of the cut pieces to fit my project design. I colored the wood by dying with Rit dye and adding painted accents using DecoArt craft paints.
Balsa wood cut with Sizzix die
To include my own personal JGoode touch, I added my own Halloween art accents to this piece. The cat, pumpkin and witch are all Jen Goode original designs you can purchase as digital stamps from Lil’ Goodies.
Halloween Digital stamps by Jen Goode at LilGoodies.com
Here are more pictures of the process to make this Happy Halloween wall decor… I had so much fun!
Making Happy Halloween wall decorDetails on my Happy Halloween wall decor
I’d love to see what fun you can create with these amazing products! Check out Eileen Hull’s website to see more great project ideas using her new Fresh Vintage collection of Sizzix dies!
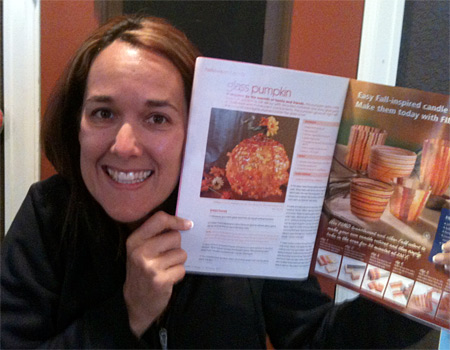
The October 2011 issue of Crafts ‘n Things has hit the news stands. I was fortunate enough to have a craft project submission included in this issue and I couldn’t be happier! The project is a glass fish bowl pumpkin, complete lid and glowing lights. You can use a variety of items to create the same collage style look. Make a pile of these pumpkins to decorate your table or place around the house this fall!
Glass pumpkin project published in Oct 2011 Crafts 'n Things MagazineGlass pumpkin by Jen Goode published in October 2011 Crafts 'n Things magazineGlass pumpkin by Jen Goode
The tutorial for this project is available in the October 2011 issue of Crafts ‘n Things, available in printed copy through various retailers or as a subscription. You can also subscribe to this magazine in digital format.
As an artist and creative brain, I’m often asked where my inspiration comes from. My canned answers is always “from life”. It’s true. Every interaction, every encounter, every moment is potentially the big inspiration for my next neat idea. However, I don’t just walk around seeing things with instant “ah ha” moments of clarity. No, it’s true, I have to think harder than that.
I gain piles of insight by surrounding myself by smart people with interesting ideas. I try not to follow too closely with other designers in the spaces I work, however, I do pay close attention to creatives and designers on TV. HGTV’s Design Star is one of these fabulous resources. It’s a reality competition style show with 12 contestants who are all Designers, in this case, focusing on interior designer. The contestants are competing to the “last one standing” by completing various design challenges. Not only is the competition interesting to me, but I also enjoy the judging as critiques. You can learn a lot by listening to the perspective of various people toward a single design.
It’s incredibly inspiring to watch the problem solving and creative thinking of designers especially in competition mode. I’m in awe of the out of the box thinking that happens when there’s a time limit and a pile of focus. My own ideas are often sparked just watching techniques and applying them to my own skill set.
Season 6 HGTV Designer Star contestants
I’m looking forward to Season 6 of HGTV Design Star which premieres tonight at 9pm/8c on HGTV. I was watching HGTV’s “House Hunters” the other day and one of the execs was house hunting for a location for the Design Star show. I’m not sure if it was an old repeat or the awesome location just outside of Manhattan was for season 6 contestants. If it’s the most recent location, this is going to be a great season with such a cool space!
As artsy as I appear to be, I’m always looking for new ideas and interesting methods… my house isn’t nearly as finished in the decor department as I’d like. BY the way, no, I’m not trying to add a penguin to every room. I’m excited to see what great creations are thought up during season 6!
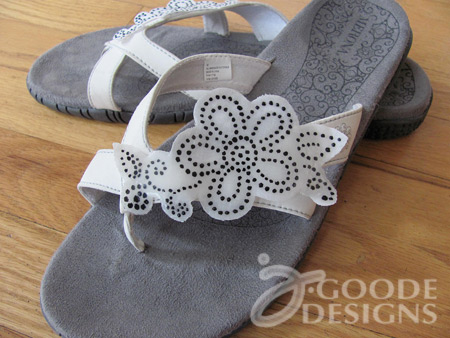
There’s a pretty little trend with summer shoes this year. Every where I look I’ve been seeing sandals and flip flops with pretty flower embellishments. So when I signed up to participate in this month’s Designer Connection Challenge featuring Tulip Beads in a Bottle from iLoveToCreate®, I decided to use the product to pretty up some of my own summer shoes.
There’s a fantastic prize pack giveaway full of creative products from iLoveToCreate®, see details below!
Embellished summer sandals by Jen Goode
To make this look you need:
Tulip Beads in a Bottle in black
White cotton broadcloth
Mod Podge
Ice Resin
Glue
Craft stick
Pencil
Scissors
The shoes I am using in this project are simple flip flop style summer sandals from Target (comfy!).
Cute sandals from Target
To make these pretty embellished flip flops:
Draw your design on the cotton fabric using a pencil.
Following manufacturer instructions, apply Beads in a Bottle along the design lines and let dry.
Coat back side of fabric with Mod Podge to prepare for resin application.
Mix resin according to instructions and apply to front side of fabric using a craft stick. Set aside to cure. After 2 hrs, you can handle the piece a bit, make sure to wear disposable gloves. I molded my piece slightly so it would not be completely flat on the shoe, but you can leave yours flat if you like. Let cure overnight.
Attach to shoe as desired using glue appropriate for your shoe material. E6000 is good choice for most materials.
Making a flower embellishment with Beads in a Bottle by Tulip
Beads in a Bottle come in a nice selection of colors. The black I have also included red, teal and a bright blue. You can create really fancy bead-like designs with just the squeeze of a bottle.
The giveaway:
iLoveToCreate® Beads in a Bottle giveaway
iLoveToCreate® is giving away a fantastic selection of creative products to one lucky winner. To enter to win, leave a comment on the Beads in a Bottle post at ilovetocreate saying what you would do with Tulip Beads in a bottle paint and we’ll draw one name to win this Tulip Prize Pack!
Check out more amazing projects using Beads in a Bottle…
School is out for all my kids, tournament baseball has begun and swim lessons start in a few days. We had our first outdoor family gathering just today… I think summer is finally here! So what’s next? July 4th festivities and all the fun that follows. However, with a full house of busy kids, time to create fun decor isn’t always abundant. I tend to spend all my entertaining prep time on the food, but you don’t need a ton of time to add extra touches for your upcoming celebrations.
This month I am participating in the Designer Crafts Connection challenge and our theme for the month is Patriotic. So, here are a couple simple patriotic craft ideas to add some extra flare to your decor filled with American spirit.
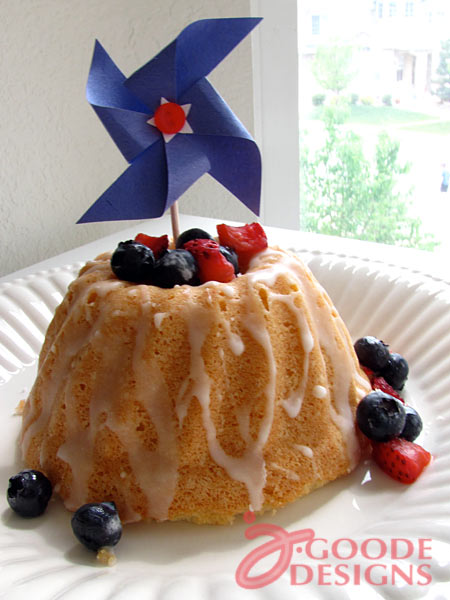
Patriotic pound cake
This pound cake is relatively easy to make, you can find the Fancy Little Pound Cake recipe at Ultimate Foodie. Top the cake off with a powdered sugar glaze, fresh blueberries and strawberries. Create a small pinwheel out of construction paper then add a white paper star cutout and a cute little red button. Glue it all to a toothpick and add to the top of the cake.
Patriotic pinwheel cake topper
Next I painted some plain glass votive candle holders with Folk Art Enamel Paint 2oz-Engine Red. Then I added some dark blue glass gems and a candle – voila, patriotic candle holders to add a bit of American flare to the table. The best part, change out the blue gems, for green at Christmas and it’s a whole new look.
Candle holders - Adding colors to create a new lookPatriotic votive candle holder
You don’t need to get all fancy or intricate to create crafts you can be proud of. The idea is to create something all your own and bask in your accomplishments. Try to find projects that fit into your budget and your schedule. If you can find something that your kids can help with, you’ve just created an opportunity to make a memory with those special to you.
I recently got a hold of a Quick Borders Craft punch by Marvy Uchida and I love it! It’s a neat paper punching tool that has interchangeable punch cartridges which allows you to create a lot of different edge effects with your paper crafts without having a huge pile of bulky individual punches. It includes with a straight edge tool so you can easily line up your cutting area to create seamless boarders to fit your projects.
Right now there are 8 different cartridges that I have. Each is a wonderful addition the paper crafting tools I already have. It easily cuts paper. The craft punch can also handle cardstock, just make sure to press the lever quickly to ensure the paper doesn’t stick in the punch area.
Over the weekend I hosted a Mother’s Day luncheon. We used the Quick Borders Craft Punch to make pretty water bottle wrappers. Each one a blank wrapper with a decorative edge so that guests could write their name on their bottle to easily find throughout the day.
Watch this video for a handy dandy demonstration of how to use this tool:
PS, I am using a new video set up, please excuse my learning curve…


 There’s a pretty little trend with summer shoes this year. Every where I look I’ve been seeing sandals and flip flops with pretty flower embellishments. So when I signed up to participate in this month’s Designer Connection Challenge featuring Tulip Beads in a Bottle from iLoveToCreate®, I decided to use the product to pretty up some of my own summer shoes.