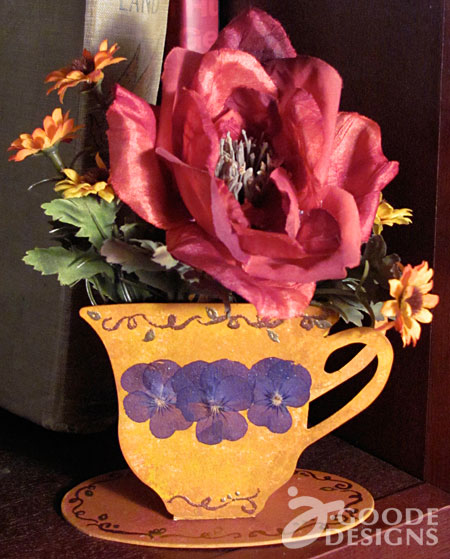
Here’s another fun project idea using a Sizzix Scoreboard die by Eileen Hull. This particular die is a tea cup and comes in 4 pieces: one tea cup shape, bottom/saucer, body (side and bottom wrap around) and a cute little tag. You’ll need to cut out 2 tea cup shapes to make the full piece.
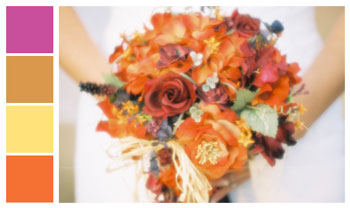
For my version of this project there was an additional color challenge suggested by Brenda Pinnick. She offered two different color themes and I chose the pretty gold and raspberry combination. Just so happens this was very similar to the color theme I had chosen for my wedding (eons ago) but because I never throw anything away, I still had some random pieces and parts from creating my bouquet and other wedding accessories. Perfect fit for me I say!
On to the crafting fun part…
How to create a tea cup flower bouquet
with the Sizzix Tea Cup die by Eileen Hull:
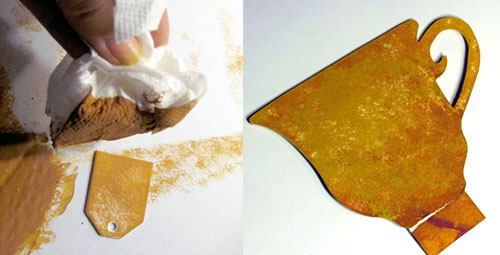
- Paint each of the individual pieces using a paper towel with Plaids craft plaint and a blotting technique. Paint in layers of a caramel color along with a mustard/gold yellow color to make the texture and color variation effect.
- Using a hot glue gun assemble the pieces to create the cup – do not attach to the saucer yet.
- Spot paint (blotting) any corners or edges that have been missed before assembly.
- Next hand paint a swirl design with embossing solution for use with embossing powder. Sprinkle on bronze and gold embossing powder and then used the heat gun to finish off the technique. Here’s a great tutorial for embossing tips and techniques.
- Using Mod Podge, decoupage 3 dried pansies (by Pressed Petals) to the front of the cup. Carefully apply a layer of Mod Podge on top of the pansies to create a thin protective coating. These flowers are extremely brittle, so make sure to not use so much glue as they will stick and pull with your brush.
- After the initial Mod Podge is dry, add an additional layer of Mod Podge to the entire cup and saucer using the same paper towel blotting technique as the painting process. This will create a subtle shine while adding a protective coat as well as a slight texture effect.
- Hot glue the cup to it’s flat saucer base.

To add a subtle scent and flowers to the tea cup gift:
- Cut two pieces of tuelle fabric approximately 6″ – 8″ square (or use 2 pre-cut 10” Tulle Circles
) layering each other so there is a double layer of fabric.
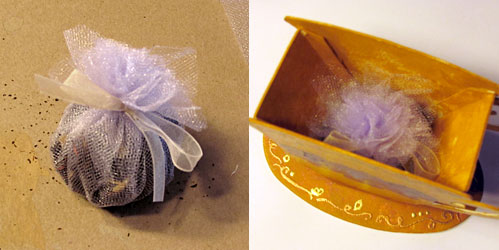
- Place approximately 1/4 c. loose tea in the center of the fabric, (I used American Tea Room‘s Broche tea – YUM!).
- Gather all sides and tie with a ribbon so there is a nice ball of tea.
- Fit the tea ball into the bottom of the tea cup.
- Cut fake flowers to desired length/height.
- Push flower stems into the tea ball in the cup to create desired flower arrangement.
Get Involved!
There is a group of us making our own variations of this project before the product actually launches – Check out all the other cool ideas created by other designers.

Other Participating designers:
- ScoreBoard Teacup
- Sizzix Blog Hop – Eileen Hull Tea Cup
- Cute mouse in a tea cup
- Life in the Craft Lane
- Sizzix tea cup by Bonnie Bruns
- Blog Hop: Sparkle’s Tea Cup
- Craftside-A behind-the-scenes peek at a crafty world
- Just a Thought or Two
- Modern Surrealist 2 in 1 Bohemian Tea Cup Magnet for the Sizzix Blog Hop!!!
- Sandy Laipply’s Sizzix Score Board Blog Hop Project
- Sizzix blog hop
- Sizzix ScoreBoard Blog Hop Tea Cup
- Tea Cup Party Favors
- Tea Cup Pin Cushion
- Tea Cup Vase
- Tea for Two in Blue
- Tea for Two, Two for Tea…
- The Perfect Blend
